April 12, 2023

Custom Work Space in my small travel trailer


I am slowly getting my little vintage travel trailer set up for making more 1:12 scale miniatures. 

As I am at present being a mostly full time traveler in my  trailer I will have to stick to smaller sized projects. Of course the cardstock miniature buildings are still being produced and sold on Etsy so I am gradually getting better at setting up and putting away the materials and various tools. My vinyl cutter is now permanently on my desktop as storing it away and putting it back out was bothering my back. But that left me a bit shy of a little work surface to set the in-feed table on or put the inkject printer on or do other small craft tasks. So I built a little plywood top with a cutting mat that rest on the open desk drawer.  Of course I also need to have a 12v refrigerator, a place to store food, drawers for puts and dishes. All that and more is in the cabinets you see in this photo. You can just see the edge of my 29" wide bed that has a few miniatures making tools stored under it.  Of course I do have a tow vehicle and it holds  other miniature making tools and materials. The cabinet doors and drawers were built while I was traveling without a workshop space so making miniatures while traveling is certainly a possibility.

October 18, 2020


I am now officially a "Nomad"  on the road full time since the beginning of August in my small vintage travel trailer pulled by my Honda Element. The combination has certainly drawn a lot of attention wherever I go. The first question people ask is "did ou have the trailer custom built to go with your car?" No one believes that it is a 50 year old vintage trailer. Of course the only thing still original on it is the fiberglass shell and the lift mechanism for the popup roof section. All of the interior is new, the frame, axle and wheels are also new as is the canvas in the popup. It even has a solar panel on the roof now and of course modern electrical plug-ins for USB devices as well as LED lighting.

 I did not have quite enough time to fully finish the interior renovation before I left so that is still going on with some electrical wiring left to do for various types of plug ins. Plus I still need to make doors for the cabinets and build a few drawers, but I brought along the tools and most of the materials for that. Once that work is done I will post photos of the completed interior.


Of course I also put in a desk space in the trailer and I have a portable workshop space, ie a dome tent with space to stand up inside of it. photo above is of my current campsite including that dome tent where I am staying in for the rest of October 2020. It is a nice place, very large campsite with picnic table, the restrooms are very close by and there are private shower rooms and toilets for the campers. I am close by to the town of Poulsbo, WA where I was living when I started this blog. But with the Covid 19 situation I am unable to visit my former neighbors who are of course still my friends.

Yes, I am still going to be making miniatures. I brought along the Coastal Cottage dollhouse to finish. Plus I am still making and selling Tiny Village kits in my Etsy store. Despite Covid 19 it has been a good year for my Tiny Village sales. Hopefully this winter, now that my vision is a little more improved and less warped looking, I can design more buildings for that series.


November 1, 2018

Tiny Village news for 2018

It has been nearly a year since I updated this blog. I suppose if the Tiny Village  had a yearly newsletter it would state that no new houses were built in the year 2018.

Of course that does not mean I am not still making and selling kits of the 48 unique buildings that I have designed in previous years. But I did take a break from designing and testing new buildings. I do know that in 2019 I will designing new building kits in a larger size and that my focus will be on selling them as patterns that people can cut for themselves. The machines such as the Silhouette and Cricut are not capable of cutting the Micro Tiny Village buildings. So when/if I design more of that size I will still only be offering them as pre-cut kits.

I am not sure if taking a break in 2018 was only to do with the loss of the detail vision in my eye sight, although that is certainly a big part of it. Or if was to do with a temporary feeling of burnout. It does take several months of design and testing before a new release happens.  It was not from lack of ideas for new buildings to make, every year I see hundreds of inspirational examples of old buildings that would be great for a Tiny Village showing up in photographs taken by travelers or in old photos from historic archive collections that get scanned and released online.

But there are other things going on as well. Transitions in where and how I will be living is the big one. I had started renovation a small older motorhome but then found something even better, a tiny, lightweight, vintage fiberglass travel trailer. It was in bad condition when I purchased it, a fixer upper, but it was lightweight which is what is I needed for my 4 cylinder car. Renovating it to make it suit my needs has been coming along very slowly but somewhat steadily for the last 18 months. Slowly because my back is lousy, a lot of days nothing gets done but on none of the days does a lot get done. A familiar tale to an aging population :) If I could put in some of those old high energy weeks I used to have in my 30s it would be done in about 4 more intense labor work weeks. 

So here is a photo of the newly painted little red caboose that I  tow behind my little red engine. It does have a popup roof section so I can stand fully upright inside of it. I will post some photos of the inside when I get it completed.

As to my eye sight, my right eye is fairly stable, some minor improvement this last 6 months , but to see anything up close I have to move my head like my cross eyed Siamese cat does turning it back and forth to get a view of it from outside of the center of my focal point.  Even then the vision of the object is distorted.  My left eye is very slowly getting worse, it too has some blurring in the central focal point and some distortion with wavy lines. My eyes working together do some cancellation of the appearance of wavy lines but that does not change the blurry area in the central focal points. I can see to drive just fine, distance vision is not an issue other than the wavy lines, watching TV or working on the computer is not all that bad, I can't read paperback books with small print but I can read E-book versions on my tablet and I can read the newspapers. It is seeing small details up close that is the issue. For instance I can't tell if the dashed lines the machine cuts to create the bends for the wall of the Tiny Village buildings are cut in a straight line. Sometimes the windows and door and the little pieces for the dormers and chimney also look crooked. My friend says they are  just fine, that they are cut nice and straight, but unfortunately they will never again look that way to me. I can't see clearly to make a small intricate cut with craft knife or scalpel blade. In terms of the quality of my life this truly is a small problem. It only limits me in a very small way except for when I want to make very small things and then it becomes a bigger problem. I have done all that can be done treatment wise, it can't be fixed with any currently available surgeries, medications or with corrective lenses. So I will adapt what I make and how I make it and that way I still get to be creative.

November 18, 2017

A magic castle light show


The micro sized 2017 Castle kit. The lighting is done with a single LED tea light that has a color changing bulb in it. These color changing tealights do a slow fade from one color to the next rather than flashing; they are very pleasant to look at.

I finally got my camera back from the repair shop so I am busy creating the instructions for the kit and they should be done in a few days.

August 13, 2017

Tiny Village Necklace


I have been playing with miniatures again. This time I put the little lighthouse from the Micro Tiny Coastal Village 2016 into a little glass dome pendant necklace. It does make a nice necklace or Christmas tree ornament or ...something fun to hang in front of a window. I plan to have a limited quantity of ready to wear ones with pre-assembled buildings inside for sale in my Etsy store for the Christmas season. But they are not listed yet as I am still waiting on the supplies to arrive which seem to be taking the slow boat from China :) When they are ready I will update this posting and add an additional one.

The dome is great as it protects the building. Overall size of the container is 1 inch wide by 2 inches high. Not all of my micro sized tiny village buildings will fit inside of the dome but quite a few of them will.

For those of you looking to purchase this size of dome you can find them in the Tim Holtz line at places such as Michaels and Joanns.  Or for a safe way to order them in larger quantities with  options for style and other colors such as silver... you can get them from an Etsy seller who ships direct from China. Buying through Etsy will give you good buyer protection policy plus additional ways to pay within this country. This Etsy store has a 5 star rating.  https://www.etsy.com/listing/485434775/4setslot-3825mm-tube-glass-dome-bottles

I am not going to stock quantities empty domes to sell with my kits. My storage space is mini sized :) This is why I tell you where to buy things such as these domes and other supplies.

December 22, 2016

Snow for Tiny Village scenes


I took a few minutes this afternoon to test out "snow" for a scene with the micro sized buildings. Obviously not a finished scene as it would need snow on the roofs and every thing properly leveled and lighted too. The snowy ground look is created with a product that used to be found at local pharmacies but now has to be ordered online. It is the very thin, bleached cotton that was used as padding around the edges of cast for broken bones. It comes in rolls and glitter will stick to it since the cotton has lots of tiny fibers making up the surface. The cotton can be layered, just pull off the straight edges so they are feathered and you can blend sections together. If also forms well for making mountain folds. Keywords to finding this product..."cotton roll cast padding". Sold for veterinary use as well as for people :) I think it gives a nice billowy look that is good for miniature scale scenes versus the much thicker quilt battings or Christmas tree skirting material. Plus it is an authentic vintage material that was used for creating such Christmas ornamental scenes. It will also hide the thin metal wires from the little LED light strings. I don't know if I will ever do a finished scene for myself as I have no safe place to store such things from year to year. But I do need to create a few for photography for marketing purposes.

Merry Christmas 2016


 "Micro Tiny Village Castle"© Karin Corbin 2016
Merry Christmas to all of you. There is a golden castle in my hand...this gift from me given to myself was getting this prototype done before Christmas arrived :) It really feels great to get it out of the virtual computer reality and into real life 3 dimensions. All sides of the castle including the inner courtyard sides have lots of details and a lot of great depth changes to the surfaces.

"Tiny Village and Castle" © Karin Corbin 2016

This is the larger sized version in the standard white color (my favorite look) shown with some buildings from the Tiny Village series.  The castle was designed to be used on it own or with the village buildings.


© Karin Corbin 2016

How big is it and what scale are they? Everyone always ask that!  Well castles are much bigger than a village house so it is not going to fit on a shelf in a dollhouse, you will have to put it on a table or on the floor of a child's room or next to a Christmas tree or use it on the shelf in your real house. In a 1:12 scale dollhouse the micro size is going to be the best look unless you are putting it into a 1:12 scale Castle. What scale is it? These items such as toy castles, glitter houses, Putz decorations, cardboard castles and such were not created in scale sizes, they were made in all kinds of sizes ranging from a few inches tall to a few feet high.

The size I settled on for micro was determined by experimenting with making them as small as I could make them and still have them be reliable for cutting and assembling. If I were to make the castle smaller or the village buildings smaller then I would have to start removing the smallest of the details. I like the details, that is what makes them rather magical and fun to look at and interesting to put together and the details I put into my micro tiny and standard tiny buildings elevates them above what others are providing to the marketplace.

I still have a few very minor adjustments to make before I start the process of creating the step by step, photographic illustrated directions for the assembly. Plus I need to order in the materials for packaging and then figure out what it will weigh for shipping.

October 25, 2016

Penciling it in


The micro size version of the 2016 Tiny Coastal Village. Now available in my Etsy store along with the larger size too.

February 10, 2016

Pupply onboard!


A new crew member signed onto the good ship Antelope yesterday evening. It's a baby boy standard poodle, color red. Smart as a whip. Brio (his name) learned the commands sit and (lie) down before bedtime and I mean he really has it nailed down for response time to get his bottom stuck down to the deck. This morning he added come and spin (in a circle) to his bag of tricks. You might wonder why teach him to spin right away. It is a great way to teach them to greet people. Puppies and even grown dogs need some way to release excitement when they meet people instead of indulging in the natural inclination to jump up on them. He will be a very large dog when full grown but at the moment he is still small enough to fit into my 15lb cat's harness and fleece sweater so those will serve as his baby clothes. He has not met the two cats yet.

November 14, 2015

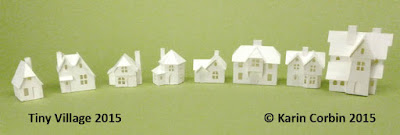
Tiny Village 2015 now in Etsy!!


They're here, come and get them :) https://www.etsy.com/shop/karincorbin

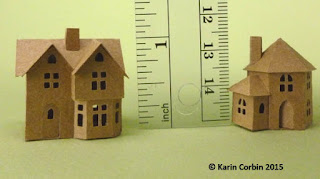
The micro size too...

Now we will look at them one by one...


Help has arrived


This morning I had a volunteer show up to help me get the micro sized buildings assembled. But of course as many of us know its often quicker to do the job ourselves rather than trying to train volunteers how to use tools properly.

November 5, 2015

The cutting edge


My friend Don saw a photo I took where I had my craft knife shown next to a building and liked the visual. He then suggest that I do it this way for the drama! He was right of course, this really does work. There is a small pinterest button in the bar at the end of this posting. Please do share if you enjoy using pinterest. It really helps my Etsy store sales when  you do that and I appreciate your efforts in that sharing.


I don't actually cut the buildings with a #11 knife but I do use it often in the assembling of them for nudging things into position and pulling off excess wet glue. This photo  shows the knife that does the actual cutting along with a #11 knife blade. That  knife tip is so tiny I can barely see how far it is extending out of the holder. The holder is not shown in this photos, What you are seeing is the shaft that slides into the holder. But eventually I got used to knowing when the tip was extended just the right amount for the cardstock I was cutting. In other words my brain got calibrated and that will almost always happen if you quit using those training wheels (click holders) on your machine :) I certainly did fret about it for a while but then one day the fretting stopped and no more troubles since.

November 3, 2014

Fairy Tale Castles

© Karin Corbin 2014  Fairy Tale Castles, a glitter house, putz kit.

What's next? Why a fairytale castle set. Today as soon as I finish the directions for the new Tiny Tudor set I will be tweaking the castle pieces that are from the other collections and releasing them as their own grouping.

I had made up my mind to create a special grouping of the castle style buildings last Christmas. They will be cut in 4 sizes. The two sizes you are used to Micro and Tiny and also 2 more larger sizes that can be used for Christmas ornaments and decorations. I can cut thicker cardstock with my new machine so that means I can expand the designs into the full size glitter house market opportunity. Of course they are still miniatures ;).

One of these days I will do a larger castle with more turrents but that won't happen this year.

November 1, 2014

holding a ruler down for cutting

© Karin Corbin 2014, all reproduction right reserved

In a chat today I was reminded that it is easy to have trouble with some of the basic tasks in model making. This time it was how to hold a ruler firmly while cutting. My best friend happened to be close by so he became my hand model. He has that hand tremor condition but despite it can do great fine detail model making so he is perfect for demonstrating its all about how you position your fingers, not about how steady your hands are. The little finger is on the table adding stability, heel of palm can rest on the table for extra stability if needed. There is a cork backing on this steel ruler. Do not use a ruler for cutting against with a knife unless it is made from steel. Never plastic or aluminum rulers as the knife blade can snag into those materials.

October 19, 2014

The inspector general


© Karin Corbin 2014, all reproduction right reserved
Zak's favorite spot to hang out while I work. He sits right in front of the heat exhaust from the laptop. I am doing the final check on the prototypes this morning. At this stage I work right by the computer so I can make immediately stop and make any needed adjustments to the cutting files as I am assembling the prototype buildings.

I should be able to start producing the new kits tonight!  Creating the instructions usually takes several days.


October 16, 2014

Storybook style

© Karin Corbin 2014, all reproduction right reserved

When I went to cut prototypes I found I was frustrated with the assembly of one of the buildings in the Tiny Tudor set so I replaced it.  I keep getting asked when I will build a castle. Not yet! But I did add a gatehouse to the Tiny Tudor set. There are a number of fun Tudor Revival Storybook buildings in California that have arched gateways in them plus towers and overhanging dormers and bays. Of course the real thing is around in Europe as well. Anyway this is my own original design of that style of building, hope you like it :)

I will cut the prototype for this building this morning. I am busy making friends with my new cutting machine, so far I am pleased with the results.  I don't use a laser to cut this series as the pretty white paper would be not so pretty and white. They are cut with a miniature sized knife blade! Hopefully a bit more fine tuning of the settings will get rid of 99 percent of the hanging chads which will make life a lot more pleasant for me.

May 14, 2014

learning new techniques

I am getting ready to make trim moldings and cabinetry for my little vintage motorhome. The motorhome will become my new work space for making miniatures.

I have decided to use a cabinetry style for my project that is inspired by the architects Greene and Greene. They are famous for the Gamble House which is now a museum in Pasedena, CA.

One of the features of the cabinetry are small wooden plugs that get installed over recessed screw heads. They are of a contrasting wood. A bit like beautiful buttons dressing up a jacket they dress up and accent the wood work. But of course I want to be efficient in my methods of work so I sought out a tutorial for them.  You might want to watch it if only for the method of safely controlling small pieces of wood on a router table while you put a profile on the edge. That part of the segment is at the end of the video at 14:30 minutes.

February 10, 2014

Xtra sharp craft knives


I am one of "those" people who sharpen their #11 knife blades. In fact I sharpen them before I use them. Those blade edges feel rough to me when they are new as I am so used to how they  feel when beautifully sharpened. No I am not one of those crazed people who loves the physical process of honing tools.  Instead I have a quick and easy method that takes less than a minute to get the job done. My sharpening tool is very portable as it is the size of a credit card. So if you are heading off to a class or club meeting it will tuck right into your traveling tool bag.

My sharpening system:

One Xtra fine, 1200 mesh diamond coated piece of credit card sized steel. I bought mine at Rockler (see photo below). But sometimes I see them in hardware and sporting goods stores. You must have  the Xtra fine grit.

Remove the label from the back of the card and on that back side adhere a piece of 3200 Micro-mesh abrasive paper also purchased from Rockler. Another source for this kind of micro grit is for polishing out scratches in acrylic (perspex) windshields.

I use 3M carpet tape for the adhesive for the micro mesh  abrasive paper as it is wide enough to cover the steel surface without having a seam but you could also use a spray adhesive. No lumps on the surface under the paper allowed. This is VERY important as you must have an absolutely flat surface to hone the knife properly.  The sharpening card will likely come with a sticker on the backside and you will need to remove that sticker and any adhesive left from the sticker. One reason this sharpening system works better than regular sharpening stones or leather strops is because the surfaces of this stainless steel card are very flat and they will stay that way.

Method: a drop or so of water on the diamond side. Holding the knife so the beveled edge of the knife is flat to the surface of the diamond card and give it 10 strokes or so per side of the blade. Next turn the card over to the micro mesh side, drop of water for lubrication and another 10 or so strokes to polish the blade edge. I get asked which direction to push or pull the blade. After experimentation my conclusion is it does not make a lot of difference. I find I am often using and short stroke back and forth  motion rather than focusing on going only in one direction. That is likely something I began doing because the blade that has such a short length. I also get asked what is the angle of degree you hold the blade at. Only one answer, I have no idea what angle they set the blade grind to be. I just match the angle the blade was ground at to place it flat against the surface. You can become sensitive to feeling it flat against the surface.  Its just a matter of practice rather like learning to eat with a fork when you were a toddler. Our brains will develop the sense of what is right within a short time and memorize the angle to hold it at, then you won't even have to think about it, you will just do it.

Because the #11  knife blade is so short I am really only working along the edges of the card. But if you are sharpening the flat chisel type craft blades #17, 18, etc. you can do those in the center of the card as your knife handle won't get in the way.

 You can wash your card with soap and water if the grit starts to get filled up with metal that you have honed off the blade. No solvents please as they will destroy the micro mesh paper.

Unless the blade breaks you can use the same knife blade for ages and always keep it scary sharp, even sharper than when it was new out of the package :) Some people actually like using blades with broken tips if they don't need the tiny point for cuts so there you go, no waste at all.

Now that my accidental knife point prick in my thumb has healed over while I wrote this posting I can get back to doing the tutorials for the Old Town project.

http://www.rockler.com/ to  purchase the extra fine diamond coated steel card and the micro mesh abrasion material to adhere to the backside of the card.

© Karin Corbin 2014, all reproduction right reserved


January 6, 2014

My favorite sharp pointed scissors

photo from Amazon

It has been a while since I did tool talk so I think I will indulge myself in a snippet of it as I have this tool out for use today.

I have owned quite a few small, sharp pointed scissors over the years. Including the ones all the quilters rave about. But not one single pair comes even close to the precision and quality of a pair I purchased at a fly fishing store. The point of this scissors is so sharp and precise it can easily pierce you so you need to be sure to keep a protector over the tip when not in use.

They have a fine adjustment screw for tension when cutting varying thickness of materials. The finger loops are generous and comfortable since this is a product designed for use by men. There is a little rubber bumper between the loops to prevent a hard, pinching close. Not many companies pay that kind of attention to details or put their manufacturing dollars towards that kind of feature.

The blades are thin enough to sneak in and make tiny snips and the point is precise enough to do exactly that.

Here is a link to the Dr. Slick Catalog page for this item. DR. SLICK CO
These scissors are available from a lot of sources, you might even find them locally if you have a fly fishing store around. But not all fly fishing scissors are of this quality. This is the premium pair in the Dr. Slick line of tools, worth the extra dollars they cost. 

They will always be in my tool box.

© Karin Corbin 2014, all reproduction right reserved

December 25, 2013

December 20, 2013

Old Town Clock Tower Gate


Tiny Glitter House, Putz by Karin Corbin
 The old cities in Europe often had a number of gates into the different sections of town. This is my interpretation of one of those buildings. I found a photo of a real building of that type which had the tower coming into the building at that same 45 degree angle. That angle really livens things up a bit!

No clock on my prototype.  I will have to make one to put on my instructions website as an option that can be used as a printable.  But it might be nearly impossible to tell what it is on the micro scale version if there was glitter over it.

I love the look of that crystal star under the house. It is a crystal wine glass turned upside down. Certainly makes for a classy display stand for a prototype. But even better is that it elevates it above the clutter on my worktable so I did not have to clean up just to take a quick photo. Now that really speeds up a photograpy session.


November 9, 2013

The Fairy Ring


photo copyright Karin Corbin 2013
 Buy the Micro Tiny Village houses for making your own  projects at Karin Corbin's Etsy store

At last I got around to taking some time to play with the toys I have been making. Not your 1950 glitter house scene, this scene harkens back to days of old.  I can easily see this project as an illustration in a faerie tale from the late 1800's. Mushrooms were very popular subjects in the beautiful European Christmas cards of that era and the style of buildings I design are the same types featured on those cards.  

I found a mushroom decoration at the local florist yesterday. I had gone in looking for a few things to use in photos. This scene is 6.5" tall and the base the mushrooms stand on is only 2.75" wide. (See the link at the bottom of this posting for ordering the mushroom piece I used in the project from an online source.)

These are the pieces from the micro sized, gingerbread colored Tiny Villages. It is a combination of the 2012 and 2013 pieces. I had to add in a few extra pieces to get it filled in as much as I wanted.
I combined three of the buildings to create a cojoined grouping. A little trimming of roofs is all that is needed to be able to glue them together in a row.
Photo copyright Karin Corbin 2013

Faerie Rings are found in forest clearings. There is a ring of mushrooms with the center area empty.
My Fairy Ring is on top of a mushroom with the Queen's castle in the center. A tiny magical place to visit in a magical season.

photo copyright Karin Corbin 2013
The snow on the roofs and the ground was created with Scribble brand, dimensional fabric paint. Before the paint dried I sprinkled it with ultra fine, crystal glitter. The glitter on the houses and trees is from Barbara Trombley, she makes very beautiful blends of glitter colors. I wanted a soft, almost monochromatic color scheme to go with the mushrooms.

The mushrooms I used are cloth covered. I trimmed back the fuzzy surface of the fabric with a pair of scissors then I coated the fabric surface with white gesso and then some lightweight acrylic modeling paste before I started applying glitter and the buildings. The acrylic modeling paste can be used to create a raised snow effect on the ground. Glitter will stick to the wet modeling paste.


How to make a mushroom for your micro tiny village.
http://www.marthastewart.com/287433/spun-cotton-ornaments

Where to purchase the mushrooms online. Remember the mushrooms are a seasonal item and might be out of stock at certain times of the year.
http://www.trendytree.com/raz-christmas-and-halloween-decor/raz-6-clip-on-green-brown-mushroom-christmas-ornament-set-of-2.html

Happy Holidays,
Karin

www.etsy.com/shop/karincorbin

November 2, 2013

Miniature glass domed architectural model


photo copyright  Karin Corbin 2013
The Tiny Village buildings are not just for turning into glitter houses. In the 1800's and early 1900s people collected architectural models. Many were made from white plaster or white paper. They were generally exhibited in glass cases or under domes. White objects that could not be washed and coal fires did not coexist peacefully.

My Etsy Store is now open for buying the kits.

This posting is dedicated to the gentlemen of Merriman Park who might say..."darling the model could use a touch of gesso to cover the cracks"  http://john-merrimanpark.blogspot.com/


January 31, 2013

Gatehouse Portal


My love affair with gatehouses started many years ago. How could I resist adding one to the Tiny Village collection? It is #15 and a definite keeper! This is the first prototype, almost right but as always there is a little more fine tuning to be done. But there are not any visible changes to be made. Only a few adjustments that will help make easier the alignment of the walls of the towers. Those tower sections might look large in the photo but they are only 2/10ths of an inch wide and 1 inch tall.

The detailing at the top of the towers folds down to create that layered look. A bit of extra work for you as a dab of glue has to be put under each section but it is not difficult to do.


There is another new building, a nice little house #14, just to the right of the gatehouse building.

July 13, 2012

Dollhouse Dormer Part 3

Cutting dormers for the Elizabethan birdhouse part 3.

Today I am cutting the window openings in the dormers using a miniature table saw with a 3 and3/8" diameter blade. 

First thing to do is draw lines right onto your tablesaw top. Use a felt tip marker and  a straight edge draw a put a line across the top that is the same width of the saw blade that runs parallel with the blade. Then draw a line perpendicular to that line to indicates the center of the saw blade's arbor hole.
photo copyright Karin Corbin 2012

That intersection of those two lines is the center point of where your blade will come through when you raise it up through your panel.

The first two sides of the window openings, top and bottom, were done using the table saw fence against the bottom edge of the dormer. The top point of the dormer lines up with the line indicating center of the arbor.

The last two cuts are created by placing the bottom edge of the dormer against the miter fence and using those lines on the table top as my reference point I line up the dormer to center the blade on my cutting line.
photo copyright Karin Corbin 2012

Because my window is centered on the peak of the dormer I have used double back tape to stick to temporary plywood fences to the top of my table saw (those are the light colored wood). Now I can just flip the dormer piece  over after making the first cut to make the second cut without recalibrating my position.  Note in the photo that I have clamped the dormer to the table saw top to make these cuts. When it is possible to use clamps I always take the time to do so instead of risking my fingers.

Cutting dormers part 1
Cutting dormers part 2

July 4, 2012

Got Birds?

photo copyright Karin Corbin 2012

photo copyright Karin Corbin 2012

On holidays and weekends my two  cats get to go out into the hallway. They love to run up and down the stairs playing tag. Sitting in the birdhouse that now serves as a hideout, ready to launch a sneak attack, is one of the games they play. 

A few years ago they actually did catch a big fat mouse in this hallway at the bottom of the stairs.  I am sure they would be thrilled if another mouse came into the building.

June 20, 2012

power strop to go

photo copyright Karin Corbin 2012

 More work done today on my new carving stand including a way to power hone my tools for those scary sharp edges that cut wood as if it were butter.


My carving stand was built using a "hide-a-horse", lightweight (7lbs) folding saw horse. I love it, it sets up in seconds but folds up into a very small package easy to store under a bed or in a closet.
Watch the video on this link to see how it works http://hideahorsefoldingsawhorses.com/

 A proper tool stand was made to fit. It is screwed to the base plate, not to the saw horse. The screws allow me to take this carving stand apart and flat pack it. If I wanted to I could then  put the pieces of the stand (minus the saw horse) into a suitcase and fly away with it.  I put T-nuts into the back side of the plywood to hold the vise and used plastic knob screws to go into the T-nuts. That make it fast to take apart but still strong. I have put cork sheeting on the underside so the tool stand so it can be used on its own on a table or desk.

I put a layer of thin adhesive backed cork sheeting over the magnetic, stainless steel knife bar. I purchased the bar from my local Ikea store but they can also be found on Amazon or Ebay.  The length of the bar is what determined the size of my carving stand. I like the stand to be that long because it keeps the C clamps that attach the stand to the sawhorse, desk or table top from hitting my knees. Also it gives me lots of room for hanging up carving tools. The cork sheeting is shelf liner from the Contact brand. You can find it in hardware, home center stores and places such as Walmart.
photo copyright Karin Corbin 2012

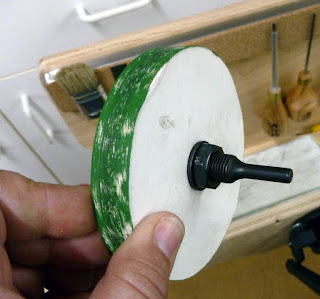
Another chore today was mounting a honing disk onto a mandrel so I could use it in my battery powered drill motor. This kind of mandrel can be found in hardware stores. The honing wheel is made by gluing layers of mat board together.  Be sure to carefully cut the circles so you don't have to do a lot of sanding to true up the disk surface after the glue is dry. Use the motor turning against a sanding block. But to get that chore done even faster turn it with the drill motor against a running power sander.
Add captionphoto copyright Karin Corbin 2012
 The green color on the wheel is honing compound. The wheel does not need to be charged with compound very often, it last a good long while.